Microsoft Word 2007 Undo Not Going Back Far Enough
On a touch-enabled device, draw with your finger, a digital pen, or a mouse.
Available inking features depend on the type of device you're using and which version of Office you're using.
Please start by choosing your version of Office:
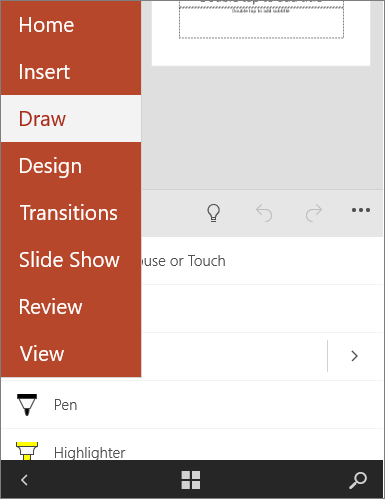
 | If your device is touch-enabled, the Draw tab is turned on automatically. Otherwise, turn it on by selecting File > Options > Customize Ribbon > Draw. |
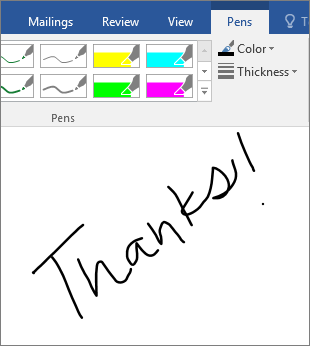
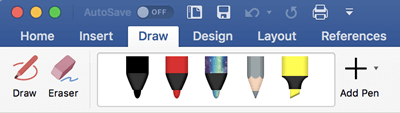
Write, draw, or highlight text
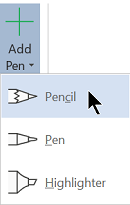
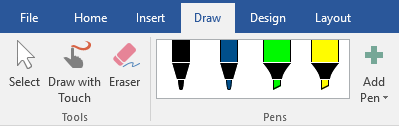
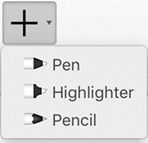
The new pen set is customizable and portable. You define the pens you want to have, and they are then available in Word, Excel, and PowerPoint.
-
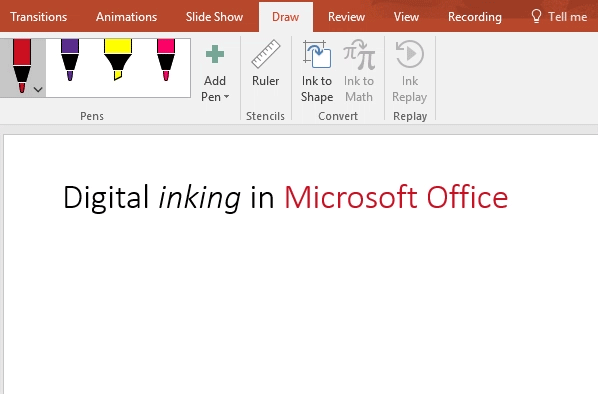
On the Draw tab of the Ribbon, tap a pen to select it.
In Word, you must be in Print layout to draw with ink. If the Draw tab is grayed out so that you can't select a pen, go the View tab and select Print Layout.
In Outlook, first tap the body of the message and insert a drawing canvas
 ; then you can select a pen to draw with.
 -
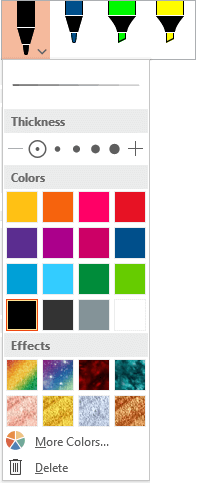
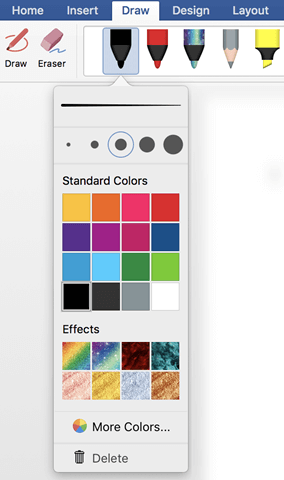
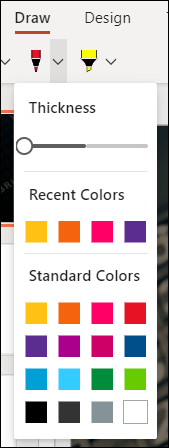
Tap again to open the menu of Thickness and Color options for the pen. Select your preferred size and color.
-
There are five pen thickness settings ranging from .25 mm to 3.5 mm. Select a thickness or use the plus or minus sign to make your pen thicker or thinner.
-
Sixteen solid colors are available on the menu, with more available when you tap More Colors.
-
Eight effects are also available: Rainbow, Galaxy, Lava, Ocean, Rose Gold, Gold, Silver, and Bronze.
-
-
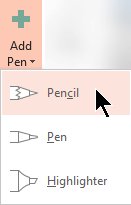
A Pencil texture is also available:
When you draw with the Pencil texture while using a supported digital stylus, you can tilt the stylus to get a "shading" effect, just like you would get with a real pencil.
-
On the touch screen, begin writing or drawing.
Once you have drawn an ink shape, it behaves like any shape that you are used to working with in Office. You can select the shape, then you can move or copy it, change its color, pivot its position, and so on.
-
To stop inking and select your annotations, either to modify or move them, select Draw
or Draw with Touch  on the Draw tab.
Convert ink to text or shapes
Word or Excel: See Convert ink to shapes in Office
PowerPoint: See Convert ink to text or shapes in PowerPoint for Microsoft 365.
More features
Select a heading below to open it and see the detailed instructions.
-
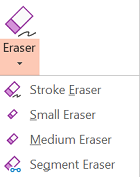
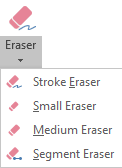
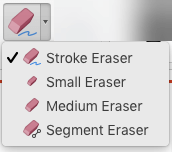
Under Draw > Tools, tap the Eraser.
(In PowerPoint for Microsoft 365, you can choose from different sizes of erasers. Word has three eraser options. Tap the down arrow on the Eraser button to pick the eraser that you want.)
-
With your pen or finger, drag the eraser over the ink you want to remove.
With the Segment Eraser in PowerPoint, you can simply tap a segment of ink or drag across it to remove it (rather than having to thoroughly wipe away the entire segment). Dragging across segments is an easy way to erase several at once.
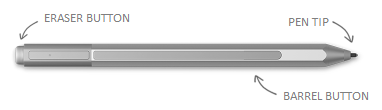
Some active pens, such as the Surface pen, have an eraser that you can also use to erase digital ink.
All apps include a Draw tool on the Draw tab of the Ribbon for switching between inking mode and selection mode.
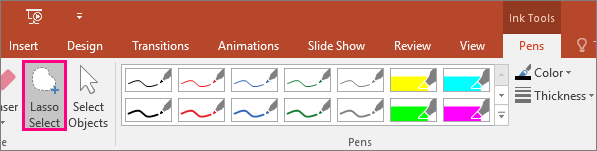
There is also an ink selection tool, Lasso Select,  or
or  for specifically for selecting objects drawn with ink. It's most useful when you have a mixture of standard and ink objects and you only want to select an ink object.
Applies only to Word, PowerPoint, and Excel:
To select part of a drawing or words written in ink, use the Lasso Select tool. (This tool can't select non-ink objects—that is, shapes, pictures, etc.)
-
Under Draw > Tools on the Ribbon, tap Lasso Select
or . -
With your pen or finger, drag to draw a circle around the part of the drawing or word that you want to select. A faded, dashed selection region appears around it, and when you're done, the portion you lassoed is selected. Then you can manipulate that object as you wish: move it, change its color, and so on.

In both Excel and PowerPoint, with a digital pen, you can select an area without even tapping the selection tool on the ribbon. Use the supported digital pen button to Lasso Select ink without visiting the ribbon. Then you can use the pen to move, resize, or rotate the ink object.
-
On the File menu, select Options, and then select Advanced.
-
In the Pen section, select the box next to Use pen to select and interact with content by default.
This setting only applies to the app in which you make it, so, for example, you can have automatic inking turned on in Visio and turned off in Word.
 | If your device is touch-enabled, the Draw tab is turned on automatically. Otherwise, turn it on by selecting File > Options > Customize Ribbon > Draw. |
Write, draw, or highlight text
The new pen set is customizable and portable. You define the pens you want to have, and they are then available in Word, Excel, and PowerPoint.
-
On the Draw tab of the Ribbon, tap a pen to select it.
In Word, you must be in Print layout to draw with ink. If the Draw tab is grayed out so that you can't select a pen, go the View tab and select Print Layout.
-
Tap again to open the menu of Thickness and Color options for the pen. Select your preferred size and color.
-
There are five pen thickness settings ranging from .25 mm to 3.5 mm. Select a thickness or use the plus or minus sign to make your pen thicker or thinner.
-
Sixteen solid colors are available on the menu, with more available when you tap More Colors.
-
-
A Pencil texture is also available:
When you draw with the Pencil texture while using a supported digital stylus, you can tilt the stylus to get a "shading" effect, just like you would get with a real pencil.
-
On the touch screen, begin writing or drawing.
Once you have drawn an ink shape, it behaves like any shape that you are used to working with in Office. You can select the shape, then you can move or copy it, change its color, pivot its position, and so on.
-
To stop inking and select your annotations, either to modify or move them, pick Select
 on the Draw tab.
Convert ink to text or shapes
See Convert ink to text or shapes in PowerPoint for Microsoft 365.
More features
Select a heading below to open it and see the detailed instructions.
-
Under Draw > Tools, tap the Eraser.
(In PowerPoint for Microsoft 365, you can choose from four erasers. Tap the down arrow on the Eraser button to pick the eraser that you want.)
-
With your pen or finger, drag the eraser over the ink you want to remove.
With the Segment Eraser in PowerPoint, you can simply tap a segment of ink or drag across it to remove it (rather than having to thoroughly wipe away the entire segment). Dragging across segments is an easy way to erase several at once.
Some active pens, such as the Surface pen, have an eraser that you can also use to erase digital ink.
When you've been drawing with ink, you can use Stop Inking  on the Draw tab to change the mouse pointer back to a standard selection tool . The selection tool can select digital ink drawings and any other kind of objects.
PowerPoint and Excel also have an ink selection tool, Lasso Select,  specifically for selecting objects drawn with ink. It's most useful when you have a mixture of standard and ink objects and you only want to select an ink object.
Applies only to PowerPoint and Excel:
To select part of a drawing or words written in ink, use the Lasso Select tool. (This tool can't select non-ink objects—that is, shapes, pictures, etc.)
-
Under Draw > Tools on the Ribbon, tap Lasso Select
. -
With your pen or finger, drag to draw a circle around the part of the drawing or word that you want to select. A faded, dashed selection region appears around it, and when you're done, the portion you lassoed is selected. Then you can manipulate that object as you wish: move it, change its color, and so on.
In both Excel and PowerPoint, with a digital pen, you can select an area without even tapping the selection tool on the ribbon. Use the supported digital pen button to Lasso Select ink without visiting the ribbon. Then you can use the pen to move, resize, or rotate the ink object.
-
Select File > Options > Advanced.
-
In the Pen section, select the box next to Use pen to select and interact with content by default.
This setting only applies to the app in which you make it. So, for example, you can have automatic inking turned on in Visio and turned off in Word.
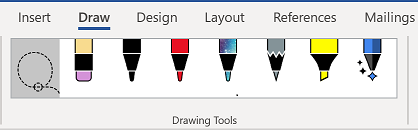
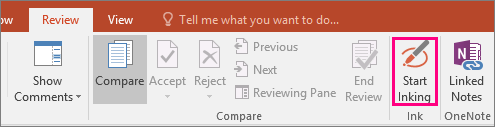
Find the drawing tools
Go to the Review tab and select Start Inking to display the Ink Tools and Pens tab.
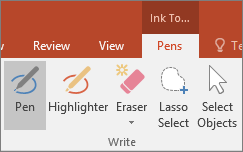
Write or draw
-
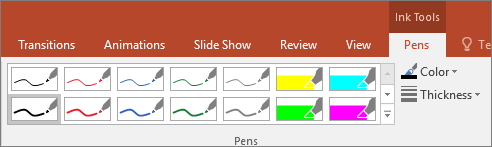
Under Ink Tools >Pens choose Pen.
-
To change the ink color and stroke width, point to the color and width (0.35mm - 0.5mm) you want.
-
On the touch screen, begin writing or drawing.
Highlight text
-
Under Ink Tools, on the Pens tab, click Highlighter, and then pick a highlight color.

-
Point and drag your pen or finger over the text that you want to highlight.
You can highlight text in Excel, Word, and Outlook, but PowerPoint doesn't support highlighting text.
Delete whole written words or ink drawings
-
Under Ink Tools, on the Pens tab, click the arrow below Eraser, and then pick an eraser size.

-
With your pen or finger, select the word or ink drawing that you want to erase.
Drawing in OneNote
If you're using OneNote and want to draw, see these other articles:
 OneNote for Windows 10: Write notes and draw in OneNote
 OneNote: Draw and sketch notes on a page
Extra features in PowerPoint
Select parts of an ink drawing or written words (PowerPoint only)
To select part of a drawing or some written words, use the Lasso tool. (You cannot use the Lasso tool to select non-ink objects (shapes, pictures, etc.).
-
Under Ink Tools, on the Pens tab, click Lasso Select.
-
With your pen or finger, drag to draw a circle around the part of the drawing or word that you want to select. A faded, dashed selection region appears around it, and when you're done, the portion you lassoed will be selected.
Delete parts of an ink drawing or parts of written words (PowerPoint only)
-
Under Ink Tools, on the Pens tab, click the arrow below Eraser, and then pick an eraser size.
-
With your pen or finger, select parts of the ink drawing or text that you want to erase.
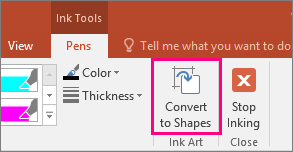
Convert ink drawings to shapes (PowerPoint only)
You can convert ink drawings on a touch screen into common shapes.
-
Under Ink Tools > Pens, select Convert to Shapes.
-
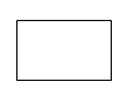
With a pen or your finger, draw a shape on the slide, and PowerPoint automatically converts your drawing to the shape that looks most like it.
To stop converting shapes, click Convert to Shapes again.
Which shapes can PowerPoint convert?
When you create an ink drawing, PowerPoint can convert it to the shape that is most like it.
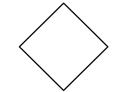
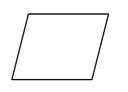
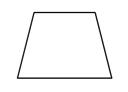
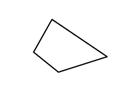
| Ink drawing | Corresponding shape |
|---|---|
| Rectangle | Rectangle |
| Square | Rectangle with all sides equal |
| Diamond | Diamond |
| Parallelogram | Parallelogram |
| Trapezoid | Trapezoid |
| Irregular quadrilateral | Closed freeform shape with four sides |
| Regular pentagon | Pentagon with all sides equal |
| Regular hexagon | Hexagon with all sides equal |
| Ellipse | Ellipse |
| Circle | Ellipse with shape height and width equal |
| Single-headed arrow | Arrow |
| Double-headed arrow | Double arrow |
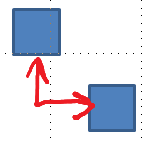
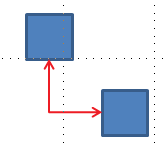
| Arrows connecting two shapes | Arrow connectors |
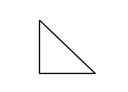
| Right triangle | Triangle with right angle |
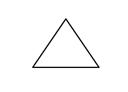
| Equilateral triangle | Triangle with all sides equal |
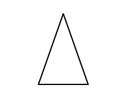
| Isosceles triangle | Triangle with two equal sides |
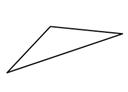
| Irregular triangle | Closed freeform with three sides. |


For more information about using Office with Windows touch devices, see the following:
-
Office Touch Guide
-
Read documents in Word
Write, draw, or highlight text
 On the Mac, these features are only available in Microsoft 365 and Office 2019 for Mac.
-
On the Draw tab of the Ribbon, tap a pen to select it.
-
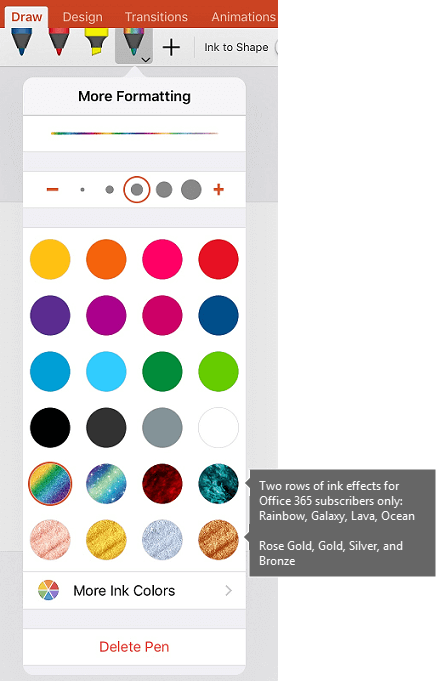
Tap again to open the menu of Thickness and Color options for the pen. Select your preferred size and color.
-
There are five pen thickness settings ranging from .25 mm to 3.5 mm. Select a thickness to make your pen thicker or thinner.
-
Sixteen solid colors are available on the menu, with more available when you tap More Colors.
-
Eight effects are also available: Rainbow, Galaxy, Lava, Ocean, Rose Gold, Gold, Silver, and Bronze.
-
-
A Pencil texture is also available:
When you draw with the Pencil texture while using a supported digital stylus, you can tilt the stylus to get a "shading" effect, just like you would get with a real pencil.
-
Once you have drawn an ink shape, it behaves like any shape that you are used to working with in Office. You can select the shape, then you can move or copy it, change its color, pivot its position, and so on.
-
To stop inking and select your annotations, either to modify or move them, undo the selection of the Draw button on the Draw tab.
Touch drawing with a trackpad
Rather than drawing ink with your mouse, you can draw on a trackpad with your finger. See Use your trackpad for "touch" drawing for more information.
Erase ink
-
Under Draw > Tools, tap the Eraser.
(In PowerPoint for Microsoft 365 for Mac, you can choose from different sizes of erasers. Word has three eraser options (version 16.28 or newer). Tap the down arrow on the Eraser button to pick the eraser that you want.)
-
With your mouse, pen, or finger, drag the eraser over the ink you want to remove.
Additional procedures
Select a heading below to open it and see the detailed instructions.
PowerPoint and Excel also have an ink selection tool, Lasso Select, specifically for selecting objects drawn with ink. It's most useful when you have a mixture of standard and ink objects and you only want to select an ink object.
Applies only to PowerPoint and Excel:
To select part of a drawing or words written in ink, use the Lasso Select tool. (This tool can't select non-ink objects—that is, shapes, pictures, etc.)
-
Under Draw > Tools on the Ribbon, tap Lasso Select
. -
With your mouse, pen, or finger, drag to draw a circle around the part of the drawing or word that you want to select. A faded, dashed selection region appears around it, and when you're done, the portion you lassoed is selected. Then you can manipulate that object as you wish: move it, change its color, and so on.
-
On the PowerPoint, Word, or Excel menu, select Preferences > Authoring and Proofing Tools > General.
-
In the Pen section, clear the box next to Use pen to select and interact with content by default.
This setting only applies to the current app. So, for example, you can have automatic inking turned on in Excel and turned off in Word.
Basic inking tools
Word for iOS, Excel for iOS, and PowerPoint for iOS all come with basic inking options on the Draw tab: a selection tool, a draw-with-touch tool, a stroke eraser, pens, multiple ink colors, and ink thickness options:

 If you're working in OneNote on your iPad, see Handwrite, draw, and sketch.
Draw or write
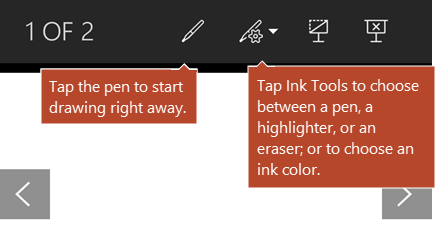
By default, Draw with Mouse or Touch (or "Inking mode") is turned on when you are using a mobile device. Just tap the Draw tab, select a pen  , and you can begin drawing ink on a slide.
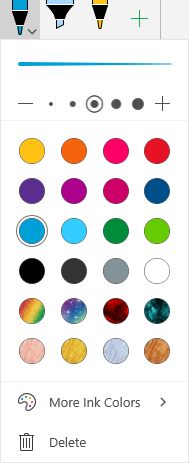
To change the settings on a pen:
-
Tap again to open the menu of thickness and color options for the pen. Select your preferred size and color:
-
There are five pen thickness settings ranging from .25 mm to 3.5 mm. Select a thickness or use the plus or minus sign to make your pen thicker or thinner.
-
Sixteen solid colors are available on the menu, with more available when you tap More Ink Colors.
-
(For Microsoft 365 subscribers only) Eight effects are also available: Rainbow, Galaxy, Lava, Ocean, Rose Gold, Gold, Silver, and Bronze.
A Pencil texture is now available:

The Apple Pencil is sensitive to pressure, which allows you to vary line thickness. It's also sensitive to tilt, which allows you to create shading, as you can with a tilted lead pencil.
-
-
On the touch screen, begin writing or drawing.
Once you have drawn an ink shape, it behaves like any shape that you are used to working with in Office. You can select the shape, then you can move or copy it, change its color, pivot its position, and so on.
-
To stop inking and select your annotations, either to modify or move them, turn off Draw with Touch on the Draw tab. Turning off this feature also keeps you from making accidental ink marks when your hand touches the screen.
Watch a video overview of the inking features in iPhone and iPad:

2:47
Select
On an iOS device, Inking mode is turned on when you have selected a pen or highlighter on the Draw tab. Otherwise, you are in Select mode, and you can tap to select an object.
(If you're using an Apple Pencil on an iPad Pro device, you can make Select mode the default by going to app settings.)
PowerPoint and Excel have an ink selection tool, Lasso Select,  specifically for selecting objects drawn with ink. It's most useful when you have a mixture of standard and ink objects on a slide and you only want to select an ink object.
To select part of a drawing or words written in ink in PowerPoint or Excel, use the Lasso Select tool:
-
On the Draw tab on the Ribbon, tap Lasso Select
. -
With your pen or finger, drag to encircle the ink that you want to select.
A faded, dashed selection region appears as you drag, and when you're done, the portion you've lassoed is selected. Then you can manipulate that object as you wish: move it, copy it, delete it, and so on.
Erase
-
On the Draw tab, tap the Eraser.
Word has three erasers to choose from—a stroke eraser, a small eraser, or a medium eraser. Tap the down arrow on the Eraser button to pick the eraser that you want.
PowerPoint has those three erasers plus one more: With the Segment Eraser, you can simply tap a segment of ink or drag across it to remove it (rather than having to thoroughly wipe away the entire segment). Dragging across segments is an easy way to erase several at once.
-
Drag the eraser over the ink you want to remove.
Switch tools with the new Apple Pencil
Office for iOS supports the 2nd-generation Apple Pencil and its double-tap gesture. By default, the double-tap gesture switches from the current tool to the eraser, but the System settings on your device allow you to choose a different behavior for this gesture. This feature is available to Microsoft 365 subscribers in Word, Excel, and PowerPoint on iPad version 2.22.19020201 and later.
Turn off automatic inking
-
Open the Settings app from the home screen of your iOS device.
-
Scroll through the list of apps at the bottom of the Settings page to find your Office app, and tap to open its Settings.
-
In the app settings on the right side, at the bottom under Draw and Annotate, toggle Apple Pencil Always Draws Ink.
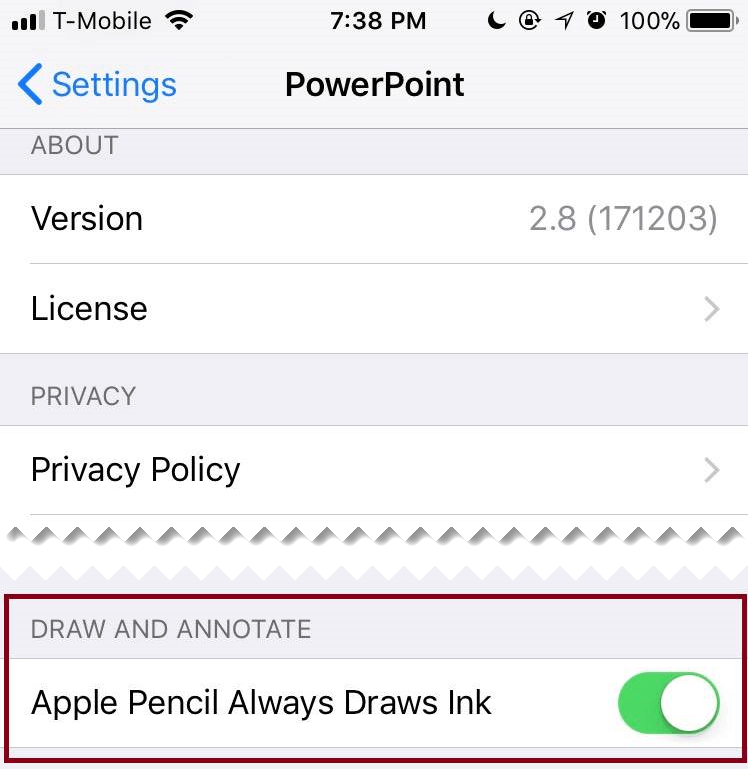
For more information, see Turn off automatic inking on iOS.
Convert ink drawings to standard shapes in PowerPoint
In PowerPoint, you can convert ink drawings on a touch screen into common shapes:
-
Ensure that Draw with Mouse or Touch
 is turned on.
 -
Tap Ink to Shapes

-
With a pen or your finger, draw a shape on the slide. When you finish drawing, PowerPoint automatically converts your drawing to the shape that looks most like it.
To stop converting shapes, tap Ink to Shapes again.
Basic inking tools
Word for Android, Excel for Android, and PowerPoint for Android all come with basic inking options on the Draw tab: a selection tool, a draw-with-touch tool, a stroke eraser, pens, ink colors and a color wheel, and ink thickness options:

Draw or write
By default, Draw with Mouse or Touch (or "Inking mode") is turned on when you are using a mobile device. Just tap the Draw tab, select a pen  , and you can begin drawing ink on a slide.
Select
On an Android device, Inking mode is turned on when you have selected a pen or highlighter on the Draw tab. Otherwise, you are in Select mode, and you can tap to select an object.
PowerPoint and Excel have an ink selection tool, Lasso Select, specifically for selecting ink drawings. It's most useful when you have a mixture of standard and ink objects and you only want to select an ink object.
To select part of a drawing or words written in ink in PowerPoint or Excel, use the Lasso Select tool.
-
On the Draw tab on the Ribbon, tap Lasso Select
. -
With your pen or finger, drag to encircle the ink that you want to select.
A faded, dashed selection region appears as you drag, and when you're done, the portion you've lassoed is selected. Then you can manipulate that object as you wish: move it, copy it, delete it, and so on.
Erase
-
On the Draw tab, tap the Eraser.
(In PowerPoint, you can choose from three erasers—a stroke eraser, or a small or medium eraser. Tap the down arrow on the Eraser button to pick the eraser that you want.)
-
Drag the eraser over the ink you want to remove.
Some active pens, such as the Surface pen, have an eraser that you can also use to erase digital ink without having to select an eraser from the Ribbon.
Convert ink drawings to standard shapes in PowerPoint
In PowerPoint, you can convert ink drawings on a touch screen into common shapes:
-
Ensure that Draw with Mouse or Touch
is turned on. -
Tap Ink to Shapes
-
With a pen or your finger, draw a shape on the slide. When you finish drawing, PowerPoint automatically converts your drawing to the shape that looks most like it.
To stop converting shapes, tap Ink to Shapes again.
Annotate with ink while showing a presentation
In PowerPoint, you can add ink markings to a slide while you are presenting:
Basic inking tools
Word Mobile, Excel Mobile, and PowerPoint Mobile all come with basic inking options on the Draw tab: a selection tool, a draw-with-touch tool, a stroke eraser, pens, multiple ink colors, and ink thickness options:

If you're working in OneNote for Windows 10, see Write notes and draw in OneNote for Windows 10.
Draw or write
By default, Draw with Touch (or "Inking mode") is turned on when you are using a mobile device. Just tap the Draw tab, select a pen  , and you can begin drawing ink on a slide.
The Draw tab in Word Mobile, Excel Mobile, and PowerPoint Mobile for Windows 10 is similar to the desktop versions of each app. Before you can use the drawing features, be sure to update to the latest version of Windows 10. To do this, select the Windows button in the lower-left corner of your screen, and select Settings > Update & security > Windows Update. Click Check for updates to get the latest updates.
To change the settings on a pen:
-
Tap again to open the menu of thickness and color options for the pen. Select your preferred size and color:
-
There are five pen thickness settings ranging from .25 mm to 3.5 mm. Select a thickness or use the plus or minus sign to make your pen thicker or thinner.
-
Sixteen solid colors are available on the menu, with more available when you tap More Ink Colors.
-
Eight effects are also available: Rainbow, Galaxy, Lava, Ocean, Rose Gold, Gold, Silver, and Bronze.
-
-
On the touch screen, begin writing or drawing.
Once you have drawn an ink shape, it behaves like any shape that you are used to working with in Office. You can select the shape, then you can move or copy it, change its color, pivot its position, and so on.
-
To stop inking and select your annotations, either to modify or move them, turn off Draw with Touch on the Draw tab. Turning off this feature also keeps you from making accidental ink marks when your hand touches the screen.
Select
Inking mode is turned on when you have selected a pen or highlighter on the Draw tab. Otherwise, you are in Select mode, and you can tap to select an object.
PowerPoint Mobile and Excel Mobile also have an ink selection tool, Lasso Select, , specifically for selecting objects drawn with ink. It's most useful when you have a mixture of standard and ink objects and you only want to select an ink object.
To select part of a drawing or words written in ink in PowerPoint or Excel:
-
On the Draw tab on the Ribbon, tap Lasso Select
. -
With your pen or finger, drag to encircle the ink that you want to select.
A faded, dashed selection region appears as you drag, and when you're done, the portion you've lassoed is selected. Then you can manipulate that object as you wish: move it, copy it, delete it, and so on.
Erase
-
On the Draw tab, tap the Eraser.
(In PowerPoint, you can choose from three erasers—a stroke eraser, or a small or medium eraser. Tap the down arrow on the Eraser button to pick the eraser that you want.)
-
Drag the eraser over the ink you want to remove.
Convert ink drawings to standard shapes in PowerPoint
In PowerPoint, you can convert ink drawings on a touch screen into common shapes:
-
Ensure that Draw with Mouse or Touch
is turned on. -
Tap Ink to Shapes
-
With a pen or your finger, draw a shape on the slide. When you finish drawing, PowerPoint automatically converts your drawing to the shape that looks most like it.
To stop converting shapes, tap Ink to Shapes again.
Open the Draw tab on Windows 10 Mobile phones
Here's how to see the Draw tab in Word, Excel, and PowerPoint on Windows 10 Mobile phones.
-
Select the More button
 in the lower-right corner of the screen.
 -
Pick the Draw tab.
Write, draw, or highlight text in PowerPoint
-
On the Draw tab of the ribbon tap a pen to select it.
-
If you want to customize the pen tap the drop arrow next to the pen on the ribbon and select the thickness, and color, you want.
The Draw menu lets you have two separate pens available, plus a highlighter.
Erase ink
Select the eraser from the pens gallery on the Draw tab, then swipe your cursor across the ink you want to erase. This is a stroke eraser, which means it will erase entire ink strokes at a time.
See Also
Languages supported for ink-to-text conversion
Turn off automatic inking on Windows or iOS
Microsoft Word 2007 Undo Not Going Back Far Enough
Source: https://support.microsoft.com/en-us/topic/draw-and-write-with-ink-in-office-6d76c674-7f4b-414d-b67f-b3ffef6ccf53
Belum ada Komentar untuk "Microsoft Word 2007 Undo Not Going Back Far Enough"
Posting Komentar